
Plastic anchors included with the model.
From the plan view of the forward deck, Jenson depicts a different anchor on either side of the deck.

Anchor location.
Jenson doesn't provide a lot of detail but he does include a sketch of one type of anchor, as well as the overall dimensions. In this sketch, he refers to two different types: a 'Fisherman' anchor and a 'Kedge' anchor but only provides a detailed drawing of one type:

Description of Bluenose anchor in Jenson's book.
Not knowing a lot about anchors, I did a little research on-line. According to Wikipedia, the Fisherman anchor is known by a number of names:
" The Admiralty Pattern, "A.P.", or simply "Admiralty", and also known as "Fisherman", is the most familiar among non-sailors. It consists of a central shank with a ring or shackle for attaching the rode. At one end of the shank there are two arms, carrying the flukes, while the stock is mounted to the other end, at ninety degrees to the arms. When the anchor lands on the bottom, it will generally fall over with the arms parallel to the seabed. As a strain comes onto the rode, the stock will dig into the bottom, canting the anchor until one of the flukes catches and digs into the bottom.
The basic design remained unchanged for centuries, with the most significant changes being to the overall proportions, and a move from wooden stocks to those of iron. Since one fluke always protrudes up from the set anchor, there is a great tendency of the rode to foul the anchor as the vessel swings due to wind or current shifts. When this happens, the anchor may be pulled out of the bottom, and in some cases may need to be hauled up to be re-set. In the mid-19th century, numerous modifications were attempted to alleviate these problems, as well as improve holding power, including one-armed mooring anchors. The most successful of these patent anchors, the Trotman Anchor, introduced a pivot where the arms join the shank, allowing the "idle" arm to fold against the shank."
The picture below illustrates the Fisherman anchor:
Fisherman anchor with loose iron stock.
As this anchor didn't match Jenson's drawing, I looked a little further and found pictures of anchors that resembled his depiction. As near as I can interpret, he referred to this configuration as a 'Kledge' anchor.

Bower (or Kledge?) anchor.
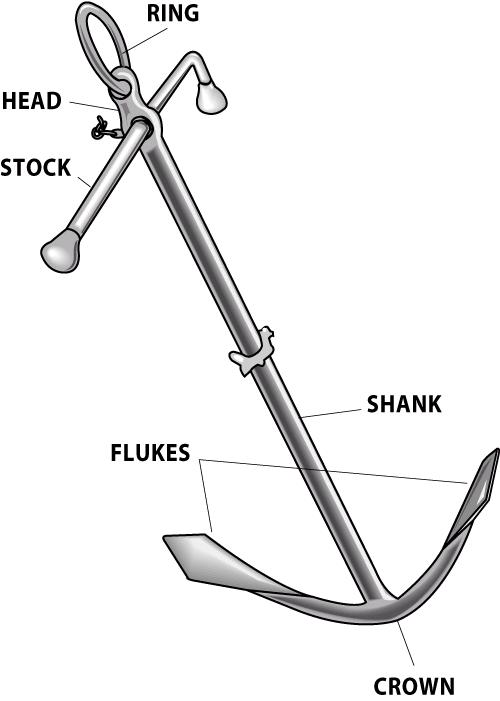
The accompanying text offers the following description:
"Ships had a variety of anchors. This is a bower anchor. A ring at the top, which was threaded through an eye, attached the anchor to its cable. The crosspiece, called a stock, has bands around it. The long, vertical bar is the shaft, at the end of which are the crown and two arms extending to either side. The large triangular pieces are called palms or flukes and each has a pointed tip known as a bill. Bower anchors, carried on either bow of the vessel, were the largest of the ship's anchors. The starboard bower was called the best bower, and the larboard bower, the small bower (even though it was usually the same size as the other one). This particular bower anchor probably came from a 74-gun ship of the line, possibly one of the Royal Navy vessels that blockaded Newport, Rhode Island."
Interestingly, Jenson provides several different names (Club, Fishing and Banks) for the anchors in his overview drawings, compared to the names he used elsewhere.
However, the important thing is to replicate the two types of anchors and not worry too much about terminology!
I didn't take any photos of the build process as it was fairly straightforward. The only tricky part was creating a hole on the respective shanks to mount the stocks. A little bending of sections of the brass wire I was using for the shanks, combined with a bit of soldering, produced acceptable results.
Here is what I ended up with - think they compare quite favourably with the plastic originals! Note that I hadn't installed the rings at this point nor the reinforcing bands on the Kedge anchor.

Kedge and Fisherman anchors relative to plastic kit versions.
To complete this area of the deck, I fashioned the catheads (davits) used to assist in releasing and retrieving the anchors. From Jenson's description, there was only one cathead on-board and it was moved as required from one side of the deck to the other, using permanently installed sockets, as depicted here:

Cathead mounted to port.
and the cathead moved to the other side:

Cathead mounted to starboard.
However, I decided to make two in order to rig both anchors simultaneously.
From the same Wikipedia article:
" Handling and storage of these anchors requires special equipment and procedures. Once the anchor is hauled up to the hawsepipe, the ring end is hoisted up to the end of a timber projecting from the bow known as the cathead. The crown of the anchor is then hauled up with a heavy tackle until one fluke can be hooked over the rail. This is known as "catting and fishing" the anchor. Before dropping the anchor, the fishing process is reversed, and the anchor is dropped from the end of the cathead."
Again, Jenson doesn't provide a lot of detail but I came across a picture on-line, as well as a drawing in the Model Shipways Kit No 2130 Bluenose Instruction Manual. (Model Shipways Manual)

Full scale catheads on the Bluenose II.

Model Shipways Kit #2130 instructions for catheads.
With these as guides, was able to fashion a couple of catheads, including the sockets, that should do the job.

Catheads mounted on both rails.
Note that the anchors now have rope-wrapped rings and the jewelry chain I picked up at Michaels looks to be just about the right scale size for the anchor chain! They even had a smaller chain that I can use for the hoist chain! (Wonder where all the dust came from!)
That's it for now. Next time, I'll cover the wheel box.
No comments:
Post a Comment